Making a Game Tutorial - Part Four
Prefabs
Now that we have our mole object and script to make it move, to make things quicker and simpler we can make this into a Prefab which is essentially a template we can use to make copies of.
In the Project window, create a folder and call it Prefabs (not necessary but it keeps our project neat and tidy).
In the Hierarchy window, select the 'MoleUnit' object and drag it over the the Prefabs folder you just created in step 1. Notice how the MoleUnit, Hole, Dirt and Mole objects in the Hierarchy window have turned blue. This is because the objects are now a prefab.
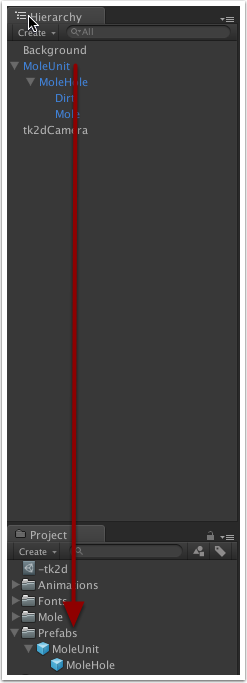
You can now simply add your MoleUnit units to the game by dragging the prefab in the Project window into the Hierarchy window. Note, if you drag the 'MoleUnit' prefab, the Hole, Dirt and Mole prefabs will follow as well. Easy!

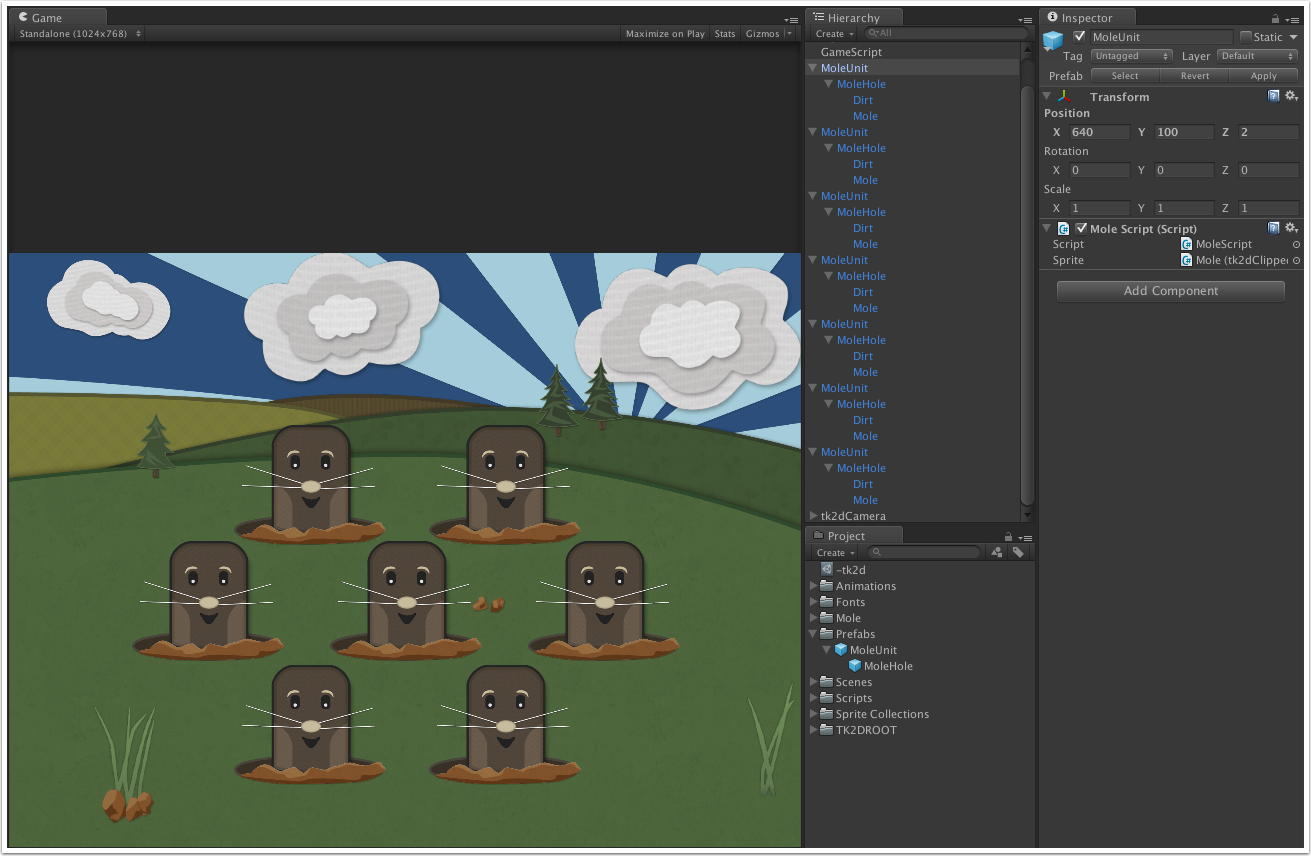
Do this for as many holes and moles as you want, remembering to change the X and Y co-ordinates of each MoleUnit object, until you end up with something like this:
Sprite Animations
Creating a Sprite Animation
So far we have used sprites from all of our created Sprite Collections except one, the Dust collection. These sprites are different in that they are going to be displayed one after another as an animation when we whack a mole.
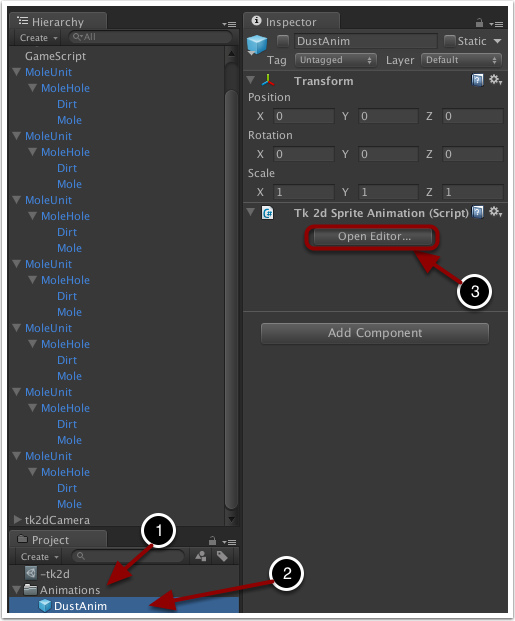
In the Project window, click 'Create > Folder' and name it Animations.
With the Animations folder selected, click on 'Create > tk2d > Sprite Animation' and name it DustAnim.
Select the DustAnim item you have just created (if it is not already selected) and click on Open Editor in the Inspector window.
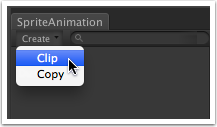
In the newly open editor window, click on 'Create > Clip'.
Name the clip 'DustCloud', in the Collection field select the sprite collection Dust, and set the Sprite field to Animated_Dust_01.
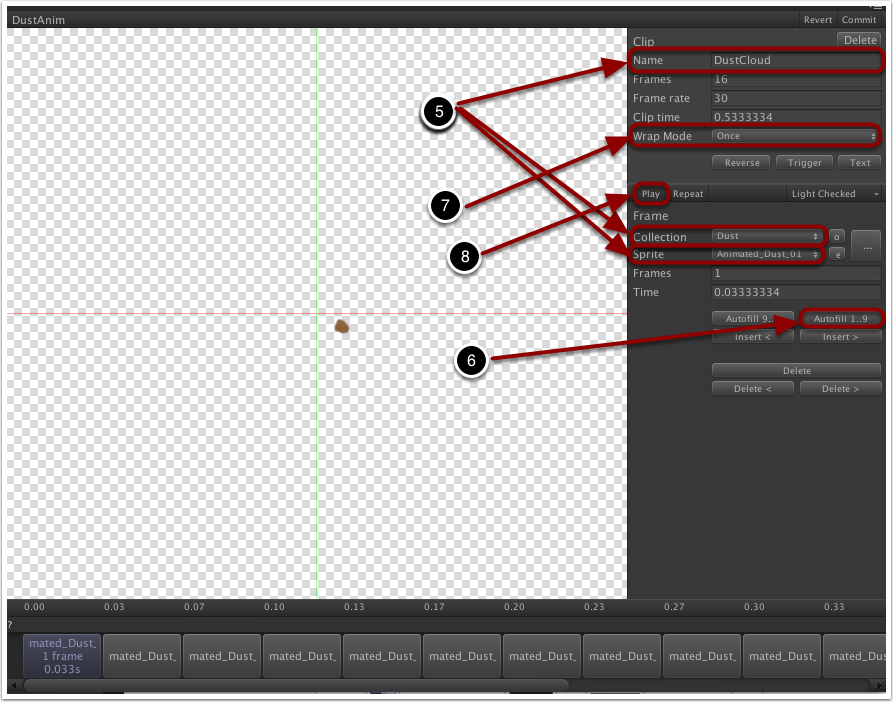
Click on the button Autofill 1..9. This will automatically add subsequently numbered clips to the animation clip.
Then in the Wrap Mode field, select Once. This setting means that each time the animation is triggered, the clip will play once then stop.
Finally, click on the Play button to get a preview of what the animation clip will look like. You can play around with various setting for the clip to make it faster or slower by altering frame and time settings.
Animating a Sprite
Now that we have created an animation clip, we can add this animated sprite to our scene.
In the Hierarchy window, click on 'Create > tk2d > Sprite With Animator' (You will find this under the 2D Object submenu in Unity 4.6 and higher).

In the Inspector window, give the animated sprite a name, I'm calling mine 'BigDust'.
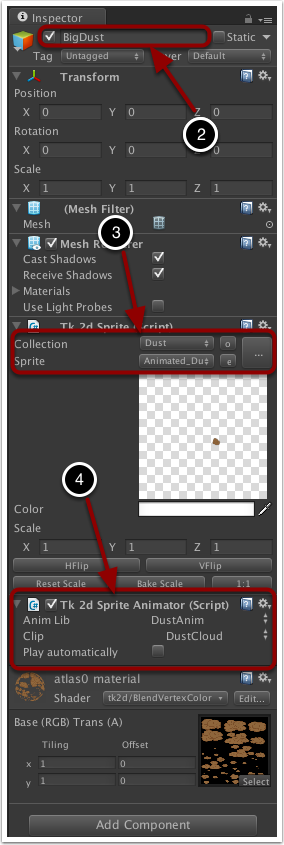
In the Tk 2d Sprite component set the Collection to Dust and the Sprite to Animated_Dust_01.
In the Tk 2d Sprite Animator component, set the Anim Lib value to your recently created DustAnim. Leave the 'Play automatically' box unchecked as we are only going to play this animation when a mole has been whacked, whereas play automatically starts the animation as soon as the game starts. The position of the animation is unimportant at this point, as we will dynamically change the position of it when a mole has been whacked.
Game Script
This is pretty much everything we need for our game now! However, although we have controllers on each of our moles, we need something to trigger the moles and to control the whole game.
In the Hierarchy window, click on 'Create > tk2d > Empty Game Object' (You will find this under the 2D Object submenu in Unity 4.6 and higher)and name it 'GameScript'.
In the Project window, select MainGameScript and drag it over onto the GameScript object in the Hierarchy window.
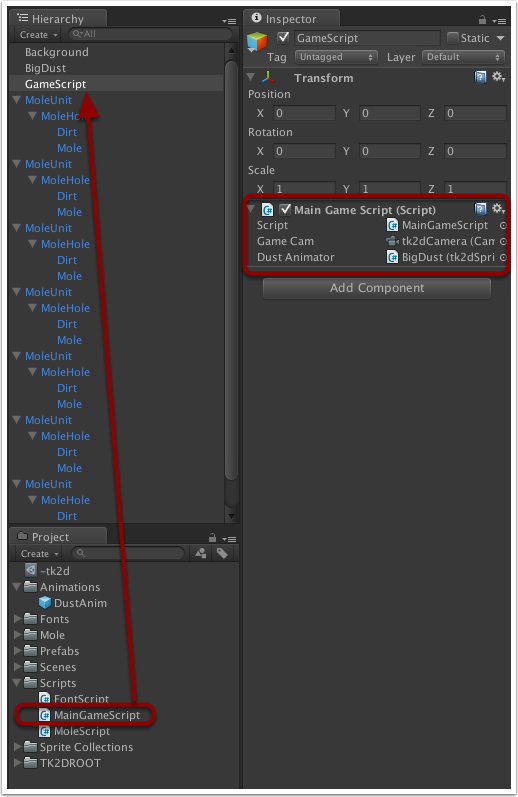
The script contains public variables for the Game Camera and a sprite animator as it needs to make use of these objects. Select and drag the camera over to the 'Game Cam' slot and do the same with the BigDust object.

For an explanation of what the Game Script does and how it works, go here
Running the game now will have the moles emerging from their holes, whereupon you are able to click on them to 'whack' them. The sprite of the whacked mole will then change, and the dust animation will be played.
Adding Text
So that's pretty much the gameplay of our game. The moles come out of the holes, you whack them, and they disappear again in a cloud of smoke. But you want to know how well you're doing in a game, right? To achieve this we'll add some text to the screen to display the score.
We are just going to use one of the demo fonts that come with the 2D Toolkit, but feel free to create your own with one of the freely available font packages you can get
Before we create our Text Mesh to hold the score, we want to ensure that it's positioned correctly on the screen. To achieve this we'll create an anchor on our camera to make it easier to position the score text.
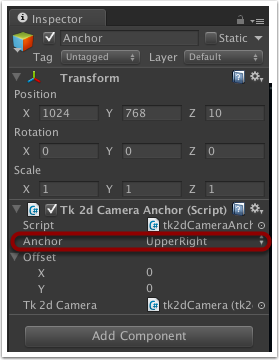
In the Hierarchy window, select the Camera object and then click on 'Create > tk2d > Camera Anchor'. (You will find this under the 2D Object submenu in Unity 4.6 and higher)
An Anchor object will appear as a child of the camera in the Hierarchy window.

I'm going to have my score in the top-right of the game window, so it makes sense to have this anchor in the upper right of the screen. Therefore in the Inspector window under Tk 2d Camera Anchor (Script), click on the Anchor selector and select 'UpperRight'. Notice how the X and Y Postion will change to the maximum X and Y values of the camera width and height settings, as this is the 'upper right' of the game screen.
As our score text is going to be relative to this newly created anchor, select Anchor in the Hierarchy window, then 'Create > tk2d > TextMesh'. (You will find this under the 2D Object submenu in Unity 4.6 and higher)
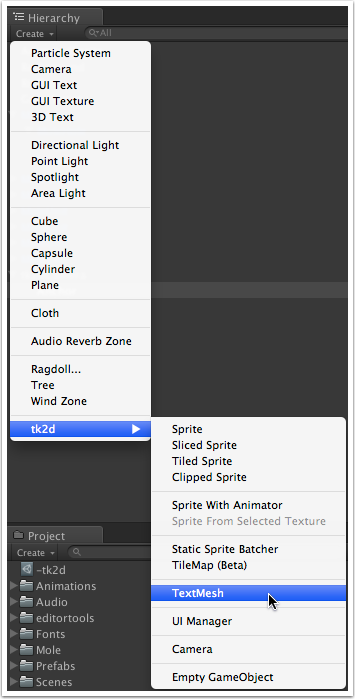
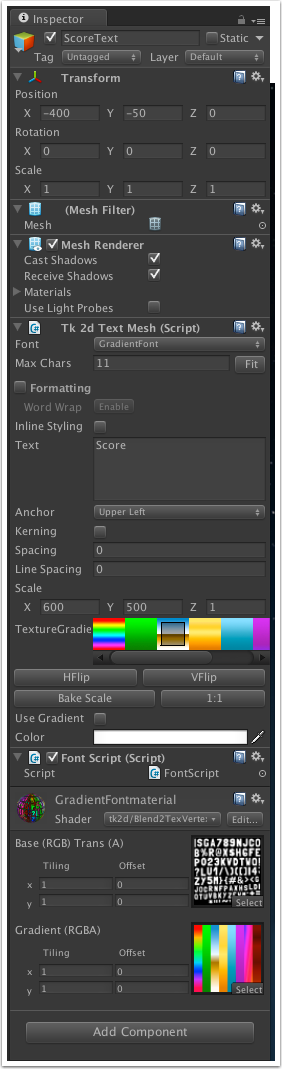
Select the newly created Text Mesh in the Hierarchy window. In the inspector window you can change various settings for the Text Mesh; one of the options here is also an Anchor setting. As the text goes from left to right, if we choose 'top right' here then the position of the text will change on the screen as the field gets bigger to accomodate more text i.e. when the score increases. So in order that the score will remain in the same place, I'm going to select 'Upper Left' as the anchor setting.
Select 'GradientFont' from the drop-down Font list and set the Max Chars value (I'm going to use 11, for the word 'Score' and the score that follows it). Note, setting the Max Chars value too big will waste memory, and setting it too small will cause the text to be cropped. Type some text in the Text box, it isn't really important what as we will change it later anyway in a script, but for now it helps us see where abouts on the screen the text will appear.
Select one of the textures from the 'TextureGradient' selection, I'm going for a nice desert-horizon look, but feel free to pick a different one.
The default font size for our camera will be too small too see, so in the Scale X and Y boxes choose something more appropriate that works with the resolution you chose. 600 x 500 works well for me.
Finally in the Transform Position X and Y boxes, input values that will place the text in a good position on the screen. Remember, the position here will be the bottom-left of the text relative to the top-right of the screen. An X value of -400 and a Y value of -50 worked well for me.
Now that we have our score Text Mesh, we need to be able to change the value of the score. In the Project window, select the Scripts folder and click on 'Create > C# Script'. Name the script 'ScoreScript' and paste in the following code. The ScoreScript is fairly straight forward and gives us a way we can get the current score value, and set the current score value.
In the Project window, select ScoreScript you have just created and drag it onto the ScoreText object in the Hierarchy window. The script will now be attached to the score Text Mesh object.
You can make up your own rules how you want to score the game, but I am going to award 10 points for a successful whack of a mole, but deduct 5 points for an unsuccessful whack attempt. As we have made our variables and functions static in the ScoreScript, we don't need to create an instance of the ScoreScript class to use it; we can simply use terminology like:
ScoreScript.Score += 10;to update the score. Therefore we can simply increase the score by adding the above line to the part of the MainGameScript code that gets called when a mole is successfully whacked ( if(mole.sprite.gameObject.activeSelf && mole.ColliderTransform == hit.transform) ). The actual code I will be using to update this core is:
ScoreScript.Score += mole.Whacked ? 0 : 10;which will prevent the player getting multiple points for continually whacking the same mole i.e. if the mole has already been whacked, zero points are added.
Adding Sound
To give a bit more depth to our game, we're going to add a few sound effects; nothing much, just sound clips for when a mole gets whacked, comes out of the hole or goes back in the hole. You can use your own audio clips if you like (the rules about what types of file can and can't be used, can be found here ), but we have provided 3 clips in the 'Projects > Mole > Sounds' folder.
To add a basic sound clip to the game is really easy!
In turn, select each of the audio clips and ensure that the 3D Sound setting is un-checked.
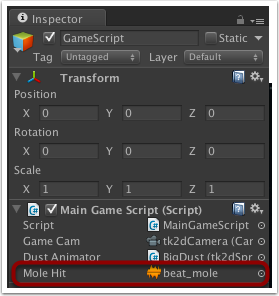
For the beat_mole sound clip, add a AudioClip variable to the MainGameScript:
public AudioClip moleHit;Then in the bit of code where it detects a successful whack of the mole (the same bit where the score code would have been added), add the following code:
AudioSource.PlayClipAtPoint(moleHit, new Vector3());This function takes an audio clip and a Vector3 as parameters. The Vector3 can be used to place a 3D sound, but as we're using a 2D sound we can just pass it an 'empty' Vector3.
Now if we select the MainGameScript in the Hierarchy window, there will now be a 'Mole Hit' attribute we can drag and drop the beat_mole audio clip to.
To add the mole_down and mole_up sounds, add the following variable declarations to the MoleScript script.
public AudioClip moleUp;
public AudioClip moleDown;
At the beginning of the MoveUp function i.e. before the loop, add the following code:
AudioSource.PlayClipAtPoint(moleUp, new Vector3());And at the end of the MoveDown function i.e. after the loop, add the following code:
AudioSource.PlayClipAtPoint(moleDown, new Vector3());Again, if we select a MoleUnit, in the Inspector window in the Mole Script section there should be a place where we can add the mole_up and mole_down clips. Do this for all of the MoleUnits.
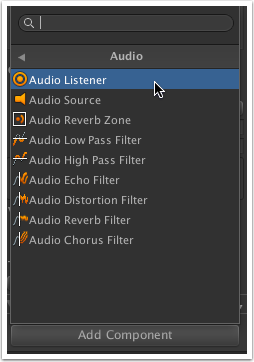
The tk2d camera should already come with a 'Listener' attached - without a Listener we will not be able to hear any of the sounds that are played. If you are using an older version of the tk2dcamera that doesn't come with the Listener attached, or are using the Unity camera and need to add a listener: in the Hierarchy window, select the tk2dCamera object, then in the Inspector window click on the 'Add Component' button, then select 'Audio > Audio Listener'. The audio listener will be added to the camera, and that's all you need to do!
And that's pretty much the end of our game! Okay, so it's not exactly Halo 4 but we've covered the all the main points for you to start creating your own games: Adding a camera, adding sprites, adding text, adding sound and scripting. And don't worry if you're not much of an artist or sound engineer - there are plenty of resources online where you can download sprites and sounds for any future games you might develop.
You can download the whack-a-mole package with what we have done so far from here if you want to compare your project with ours.
With the things we've already covered so far, you can add more to your game to make it looked more polished and come up with your own game rules, scoring mechanism and so on. And in the next section I will be showing you how I've done this.
Next Part: Coming Soon...